カードUIと好相性!CSSコピペで実装できるサムネイルhoverエフェクト

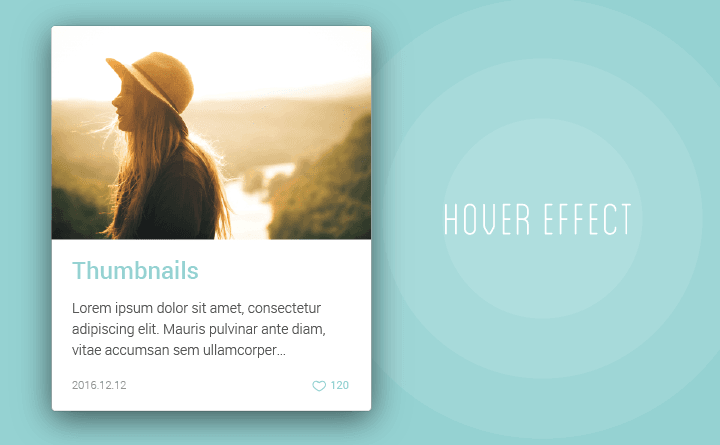
あちこちで見かけるカードUI、ブログなどにも使いやすいですよね!そこで、カードUIにぴったりなサムネイルのhoverエフェクトをいくつか作ってみました。
CSSをコピペすれば何となく使えると思うので、CSS初心者の方や実装が面倒な方はサクッとお使いください!hoverエフェクトとかPCでしか恩恵には預かれませんが…そこはご愛嬌。
ではいってみましょうー!
目次
基本のエフェクト
Type1. シンプルオーバーレイ
こちらが基本のエフェクトです。シンプルに画像の上に半透明のオーバーレイと「Read More」の文字が出てきます。
See the Pen thumbnail-hover-effect-base by Jomo (@commonsense-design) on CodePen.
コード構成
基本のコード構成はこちら。文字サイズや色などは、お好きなように調整してみてください!
それにしても意外に長い記述になりましたね…やっちまいましたね。ちなみにdemoでは、googleのアイコンフォントとOpen-Sansフォントを使っています。
基本のHTML
|
1 2 3 4 5 6 7 8 9 10 11 12 13 14 15 16 17 18 19 20 21 22 23 24 25 26 27 |
<div class="l-card"> <div class="l-thumbnail"> <figure class="thumbnail-wrapper"> <img src="img/sample.png"/> </figure> <span class="more-text"> Read More </span> </div> <div class="text-content"> <h3 class="title"> Lorem Ipsum </h3> <p class="caption"> Lorem ipsum dolor sit amet, consectetur adipiscing elit. Mauris pulvinar ante diam, vitae accumsan sem ullamcorper… </p> <div class="content-meta"> <span class="date"> 2016.12.12 </span> <span class="like"> <i class="material-icons"></i> 120 </span> </div> </div> </div> |
基本のCSS
|
1 2 3 4 5 6 7 8 9 10 11 12 13 14 15 16 17 18 19 20 21 22 23 24 25 26 27 28 29 30 31 32 33 34 35 36 37 38 39 40 41 42 43 44 45 46 47 48 49 50 51 52 53 54 55 56 57 58 59 60 61 62 63 64 65 66 67 68 69 70 71 72 73 74 75 76 77 78 79 80 81 82 83 84 85 86 87 88 89 |
/*ベースのスタイル設定*/ .l-card { overflow: hidden; width: 320px; padding: 0; margin: 24px auto; border: 1px solid #ddd; border-radius: 4px; background: #fff; box-shadow: 0px 1px 2px rgba(0, 0, 0, 0.1), 0 8px 20px rgba(0, 0, 0, 0.1); } .text-content { padding: 16px; } .text-content .title { margin: 0 0 12px 0; font-size: 20px; color: #4cc48e; } .text-content .caption { margin: 0 0 12px 0; font-size: 14px; color: #555; } .content-meta { overflow: hidden; width: 100%; font-size: 12px; } .date { float: left; color: #aaa; } .like { display: inline-block; float: right; color: #4cc48e; } .like .material-icons { vertical-align: middle; font-size: 16px; } /*ここからthumbnailのスタイル設定*/ .l-thumbnail { position: relative; overflow: hidden; width: 100%; height: auto; } .thumbnail-wrapper { display: block; margin: 0; padding: 0; } .thumbnail-wrapper::after { transition: 0.5s; content: ""; position: absolute; left: 0; top: 0; display: block; width: 100%; height: 100%; background: rgba(0, 0, 0, 0.4); opacity: 0; } .thumbnail-wrapper img{ display: block; max-width: 100%; } .more-text { transition: 0.5s; position: absolute; left: 50%; top: 50%; transform: translate(-50%, -50%); display: inline-block; padding: 6px 12px 8px; color: #fff; font-size: 14px; border: 1px solid #fff; opacity: 0; } .l-card:hover .thumbnail-wrapper::after { opacity: 1; } .l-card:hover .more-text { opacity: 1; } |
基本の仕組み
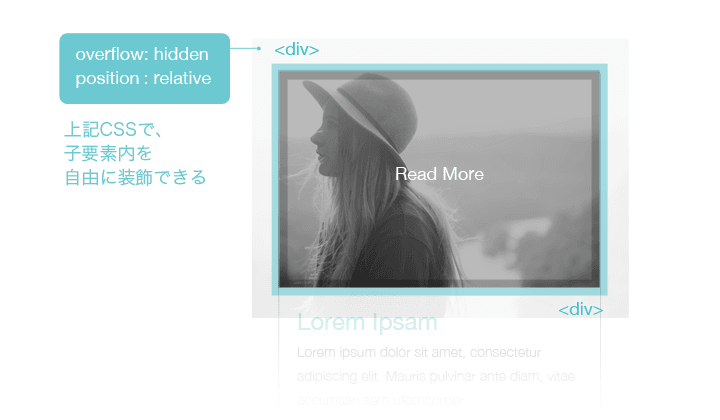
サムネイルの親要素にdivをつくり、overflow: hidden、position:relativeに。これで子要素がカードからはみ出したりすることを防ぎ、絶対配置で自由にレイアウトすることができます。
子要素にはfigure(もちろんその中にはimg要素が入ります)と、「Read More」を表示するためのspanを作ります。

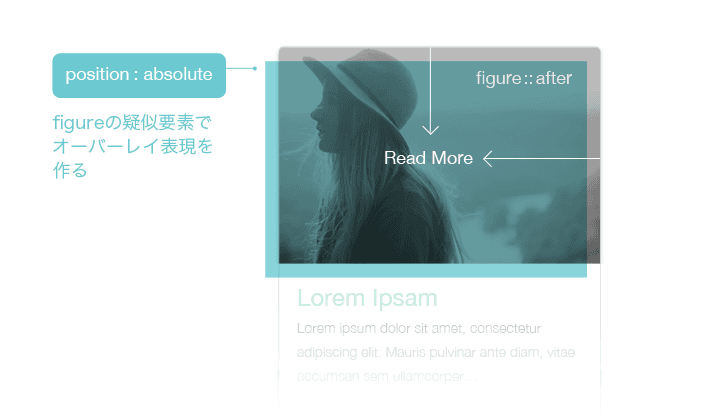
あとは疑似要素などを駆使して、色々飾り付けていくのみ! ちなみに基本のエフェクトでは、オーバーレイ用の背景をfigure::afterで作り、position:absoluteで全面表示に。「Read More」のspanを絶対配置で真ん中にレイアウトします。あとはそれぞれにtransitionとopacity:0設定し、hover時にopacity:1にすればOKです。

hoverエフェクトアイディア
ここからはサムネイル部分のCSSだけを書いていきます!無駄にボリューミィになってしまうのでね…。
基本のCSSコードの/*ここからthumbnailのスタイル設定*/というコメントアウト以降をコピペし直せばOKです。SCSSをご利用の方は、codepenをご参照ください!
HTMLは全て共通で大丈夫ですよ!
Attention
※IEではcssのfilterが効かず…!モノクロ効果やぼかし効果はIEでは再現しません。※ベンダープレフィックスは省略しています。
※テキストなどの微調整スタイルは省略しています…詳細はcodepenをご覧下さい!
Type2. モノクロ+ぼかし+ズーム
モノクロ+ぼかしの控えめなエフェクト。filterで画像をぼかすとフチがぼやけるので、ついでにズームしてごまかすという…。「Read More」の文字も、微妙に上からフェードインします。
See the Pen thumbnail-hover-effect-1 by Jomo (@commonsense-design) on CodePen.
CSS
|
1 2 3 4 5 6 7 8 9 10 11 12 13 14 15 16 17 18 19 20 21 22 23 24 25 26 27 28 29 30 31 32 33 34 35 36 37 38 39 40 41 42 43 44 45 46 47 48 49 50 51 52 |
.l-thumbnail { position: relative; overflow: hidden; width: 100%; height: auto; } .thumbnail-wrapper { display: block; margin: 0; padding: 0; } .thumbnail-wrapper::after { transition: 0.5s; content: ""; position: absolute; left: 0; top: 0; display: block; width: 100%; height: 100%; background: rgba(0, 0, 0, 0.2); opacity: 0; } .thumbnail-wrapper img{ transition: 0.5s; display: block; max-width: 100%; } .more-text { transition: opacity 0.5s, transform 0.8s; position: absolute; left: 50%; top: 50%; transform: translate(-50%, -75%); display: inline-block; padding: 6px 12px 8px; color: #fff; font-size: 14px; border: 1px solid #fff; opacity: 0; } .l-card:hover .thumbnail-wrapper::after { opacity: 1; } .l-card:hover .thumbnail-wrapper img { transform: scale(1.1); filter: blur(3px) grayscale(100%); } .l-card:hover .more-text { transform: translate(-50%, -50%); opacity: 1; } |
Type3. モノクロからカラーに
hoverでモノクロの画像がカラーに変化します。Read Moreの文字はタグっぽく装飾して、左からスライドイン。 モノクロだと画像のテイストがバラバラでも、デザイン的に統一感を出しやすいですね。
See the Pen thumbnail-hover-effect-7 by Jomo (@commonsense-design) on CodePen.
CSS
|
1 2 3 4 5 6 7 8 9 10 11 12 13 14 15 16 17 18 19 20 21 22 23 24 25 26 27 28 29 30 31 32 33 34 35 36 37 38 |
.l-thumbnail { position: relative; overflow: hidden; width: 100%; height: auto; } .thumbnail-wrapper { display: block; margin: 0; padding: 0; } .thumbnail-wrapper img{ transition: 0.5s; display: block; max-width: 100%; filter: grayscale(90%); } .more-text { transition: 0.5s; position: absolute; left: 16px; bottom: 16px; transform: translateX(-5%); display: inline-block; padding: 4px 12px; border-radius: 12px; color: #fff; font-size: 14px; background: rgba(0, 0, 0, 0.5); opacity: 0; } .l-card:hover .thumbnail-wrapper img { filter: grayscale(0); } .l-card:hover .more-text { opacity: 0.9; transform: translateX(0); } |
Type4. カラーオーバーレイ+ワイプイン
上からカラーの背景がスライドしてきます。ポップな感じのエフェクトです。
.thumbnail-wrapper::afterの背景色を変えれば、簡単にイメージチェンジできます。あとtranslateYをtranslateXにすると、横スライドにもできます。
See the Pen thumbnail-hover-effect-2 by Jomo (@commonsense-design) on CodePen.
CSS
|
1 2 3 4 5 6 7 8 9 10 11 12 13 14 15 16 17 18 19 20 21 22 23 24 25 26 27 28 29 30 31 32 33 34 35 36 37 38 39 40 41 42 43 44 45 46 47 48 49 |
.l-thumbnail { position: relative; overflow: hidden; width: 100%; height: auto; } .thumbnail-wrapper { display: block; margin: 0; padding: 0; } .thumbnail-wrapper::after { transition: 0.3s; content: ""; position: absolute; left: 0; top: 0; transform: translateY(-100%); display: block; width: 100%; height: 100%; background: #4cc48e; opacity: 0.8; } .thumbnail-wrapper img{ display: block; max-width: 100%; } .more-text { transition: 0.5s; transition: opacity 0.5s, transform 0.8s; position: absolute; left: 50%; top: 50%; transform: translate(-50%, -80%); display: inline-block; padding: 6px 12px 8px; color: #fff; font-size: 14px; border: 1px solid #fff; opacity: 0; } .l-card:hover .thumbnail-wrapper::after { transform: translateY(0); } .l-card:hover .more-text { transform: translate(-50%, -50%); opacity: 1; } |
Type5. モノクロ+ライン
どちらかというとクール系ですかね?
See the Pen thumbnail-hover-effect-3 by Jomo (@commonsense-design) on CodePen.
CSS
|
1 2 3 4 5 6 7 8 9 10 11 12 13 14 15 16 17 18 19 20 21 22 23 24 25 26 27 28 29 30 31 32 33 34 35 36 37 38 39 40 41 42 43 44 45 46 47 48 49 50 51 52 53 |
.l-thumbnail { position: relative; overflow: hidden; width: 100%; height: auto; } .thumbnail-wrapper { display: block; margin: 0; padding: 0; } .thumbnail-wrapper::after { transition: 0.5s; content:""; box-sizing: border-box; position: absolute; left: 0; top: 0; transform: translateX(-100%); width: 100%; height: 100%; border-bottom: 12px solid #4cc48e; } .thumbnail-wrapper img{ transition: 0.5s; display: block; max-width: 100%; } .more-text { transition: 0.5s; position: absolute; left: 0; top: 0; display: block; width: 100%; height: 100%; padding-top: 27.5%; text-align: center; color: #fff; font-size: 18px; text-shadow: 0 0 12px rgba(0, 0, 0, 0.8); background: rgba(0, 0, 0, 0.2); opacity: 0; } .l-card:hover .thumbnail-wrapper::after { transform: translateX(0); } .l-card:hover .thumbnail-wrapper img { filter: grayscale(100%); } .l-card:hover .more-text { opacity: 1; } |
Type6. 波動+ズーム
Material designのような波動っぽいエフェクト。波動が広がるのと同時に、Read Moreの文字幅も一緒に広がります。
See the Pen thumbnail-hover-effect-4 by Jomo (@commonsense-design) on CodePen.
CSS
|
1 2 3 4 5 6 7 8 9 10 11 12 13 14 15 16 17 18 19 20 21 22 23 24 25 26 27 28 29 30 31 32 33 34 35 36 37 38 39 40 41 42 43 44 45 46 47 48 49 50 51 52 53 54 55 56 |
.l-thumbnail { position: relative; overflow: hidden; width: 100%; height: auto; } .thumbnail-wrapper { display: block; margin: 0; padding: 0; } .thumbnail-wrapper::after { transition: opacity 0.3s, width 0.8s 0.1s, height 0.8s 0.1s, border-width 0.4s 0.1s; content: ""; position: absolute; left: 50%; top: 50%; transform: translate(-50%, -50%); width: 0px; height: 0px; border-radius: 50%; border: 0px solid #4cc48e; background: rgba(76, 196, 142, 0.7); opacity: 0; } .thumbnail-wrapper img{ transition: 0.5s; display: block; max-width: 100%; } .more-text { transition: 0.5s; position: absolute; top: 50%; transform: translateY(-50%); display: block; width: 100%; color: #fff; font-size: 16px; letter-spacing: 1px; text-align: center; opacity: 0; } .l-card:hover .thumbnail-wrapper::after { opacity: 1; width: 400px; height: 400px; border-width: 120px; } .l-card:hover .thumbnail-wrapper img { transform: scale(1.1); } .l-card:hover .more-text { opacity: 1; letter-spacing: 8px; } |
Type7. グラデーションアニメーション
keyflameアニメーションを使うことで、じわじわグラデーションが変化するエフェクトです。グラフィカルな感じを演出できます。
CSS GRADIENT ANIMATOR
See the Pen thumbnail-hover-effect-5 by Jomo (@commonsense-design) on CodePen.
CSS
|
1 2 3 4 5 6 7 8 9 10 11 12 13 14 15 16 17 18 19 20 21 22 23 24 25 26 27 28 29 30 31 32 33 34 35 36 37 38 39 40 41 42 43 44 45 46 47 48 49 50 51 52 53 54 55 56 57 58 59 |
.l-thumbnail { position: relative; overflow: hidden; width: 100%; height: auto; } .thumbnail-wrapper { display: block; margin: 0; padding: 0; } .thumbnail-wrapper::after { transition: 0.5s; content: ""; position: absolute; left: 0; top: 0; display: block; width: 100%; height: 100%; background: linear-gradient(238deg, rgba(14,236,179,0.95), rgba(239,255,17,0.95), rgba(17,255,136,0.95), rgba(223,116,255,0.95)); background-size: 800% 800%; opacity: 0; } .thumbnail-wrapper img{ transition: 0.5s; display: block; max-width: 100%; } .more-text { transition: 0.5s; position: absolute; top: 50%; left: 50%; transform: translate(-50%, -80%); display: inline-block; padding: 6px 12px 8px; border: 2px solid #fff; color: #fff; font-size: 18px; opacity: 0; } .l-card:hover .thumbnail-wrapper::after { opacity: 0.8; animation: bg-gradient 30s ease infinite; } .l-card:hover .thumbnail-wrapper img { transform: scale(1.1); filter: grayscale(100%); } .l-card:hover .more-text { opacity: 1; transform: translate(-50%, -50%); } @keyframes bg-gradient { 0%{background-position:0% 50%} 50%{background-position:100% 50%} 100%{background-position:0% 50%} } |
Type8. ぼかし+枠線アニメーション
ぼかしエフェクトに加えて、疑似要素を駆使して、枠線をアニメーションさせるタイプ。どちらかというとクラシカルな雰囲気ですかね。
枠線のアニメーションは、transitionのdelayを使って表現しています。
See the Pen thumbnail-hover-effect-6 by Jomo (@commonsense-design) on CodePen.
CSS
|
1 2 3 4 5 6 7 8 9 10 11 12 13 14 15 16 17 18 19 20 21 22 23 24 25 26 27 28 29 30 31 32 33 34 35 36 37 38 39 40 41 42 43 44 45 46 47 48 49 50 51 52 53 54 55 56 57 58 59 60 61 62 63 64 65 66 67 68 69 70 71 72 73 74 75 76 77 78 79 80 81 82 |
.l-thumbnail { position: relative; overflow: hidden; width: 100%; height: auto; } .l-thumbnail::before, .l-thumbnail::after { transition: opacity 0.1s, width 0.3s 0.1s, height 0.3s 0.4s; z-index: 2; box-sizing: border-box; content: ""; position: absolute; display: block; width: 0; height: 0; opacity: 0; } .l-thumbnail::before { border-top: 2px solid #fff; border-right: 2px solid #fff; left: 16px; top: 16px; } .l-thumbnail::after { border-bottom: 2px solid #fff; border-left: 2px solid #fff; right: 16px; bottom: 16px; } .thumbnail-wrapper { transition: 0.3s; display: block; margin: 0; padding: 0; } .thumbnail-wrapper::after { transition: 0.3s; content: ""; position: absolute; left: 0; top: 0; display: block; width: 100%; height: 100%; background: rgba(0, 0, 0, 0.2); opacity: 0; } .thumbnail-wrapper img{ transition: 0.1s; display: block; max-width: 100%; } .more-text { transition: 0.3s; position: absolute; top: 50%; transform: translateY(-120%); opacity: 0; display: block; width: 100%; color: #fff; font-size: 18px; text-align: center; } .l-card:hover .l-thumbnail::before, .l-card:hover .l-thumbnail::after { opacity: 1; width: calc(100% - 32px); height: calc(100% - 32px); } .l-card:hover .thumbnail-wrapper { transform: scale(1.15); } .l-card:hover .thumbnail-wrapper::after { opacity: 1; } .l-card:hover .thumbnail-wrapper img { filter: blur(4px); } .l-card:hover .more-text { opacity: 1; transform: translateY(-50%); } |
Type9. ひし形ワイプイン
Type4と似ていますが、疑似要素を回転させるだけで印象が変わります。
See the Pen thumbnail-hover-effect-8 by Jomo (@commonsense-design) on CodePen.
CSS
|
1 2 3 4 5 6 7 8 9 10 11 12 13 14 15 16 17 18 19 20 21 22 23 24 25 26 27 28 29 30 31 32 33 34 35 36 37 38 39 40 41 42 43 44 45 46 47 48 49 50 |
.l-thumbnail { position: relative; overflow: hidden; width: 100%; height: auto; } .thumbnail-wrapper { display: block; margin: 0; padding: 0; } .thumbnail-wrapper::after { transition: 0.8s; content: ""; position: absolute; left: -200%; top: 50%; transform: translateY(-50%) rotate(45deg); display: block; width: 400px; height: 400px; background: #4cc48e; opacity: 0; } .thumbnail-wrapper img{ transition: 0.3s; display: block; max-width: 100%; } .more-text { transition: 0.3s; position: absolute; top: 50%; left: 0; transform: translateY(-50%); color: #fff; font-size: 16px; opacity: 0; } .l-card:hover .thumbnail-wrapper::after { opacity: 0.8; left: -60%; } .l-card:hover .thumbnail-wrapper img { filter: grayscale(100%); } .l-card:hover .more-text { opacity: 1; left: 24px; } |
Type10. 透かし+枠+ズーム
親要素の.l-thumbnailに背景色を設定して透過させるエフェクトに、枠線とズーム効果を足しました。背景に設定する色や画像を工夫すれば、ガラッと印象を変えられますよ!
See the Pen thumbnail-hover-effect-9 by Jomo (@commonsense-design) on CodePen.
CSS
|
1 2 3 4 5 6 7 8 9 10 11 12 13 14 15 16 17 18 19 20 21 22 23 24 25 26 27 28 29 30 31 32 33 34 35 36 37 38 39 40 41 42 43 44 45 46 47 48 49 50 51 52 53 54 55 56 57 58 |
.l-thumbnail { position: relative; overflow: hidden; width: 100%; height: auto; background: linear-gradient(135deg, rgba(56,120,163,1) 0%, rgba(90,176,107,1) 100%); } .thumbnail-wrapper { display: block; margin: 0; padding: 0; } .thumbnail-wrapper::after { transition: 0.8s; content: ""; box-sizing: border-box; position: absolute; left: 50%; top: 50%; transform: translate(-50%, -50%); display: block; width: 0; height: 0; border: 1px solid #fff; opacity: 0; } .thumbnail-wrapper img{ transition: 0.5s; transform: scale(1); display: block; max-width: 100%; opacity: 1; } .more-text { transition: 0.8s; position: absolute; top: 50%; left: 50%; transform: translate(-50%, -50%); color: #fff; font-size: 16px; letter-spacing: -1px; text-align: center; opacity: 0; } .l-card:hover .thumbnail-wrapper::after { opacity: 0.8; width: calc(100% - 32px); height: calc(100% - 32px); } .l-card:hover .thumbnail-wrapper img { opacity: 0.6; transform: scale(1.1); } .l-card:hover .more-text { opacity: 1; letter-spacing: 4px; } |
まとめ
いかがだったでしょうか?
画像にかけるエフェクトや疑似要素の装飾など、要素を分解して組み合わせれば、もっと色々なパターンのエフェクトが作れると思います。ブログやポートフォリオサイトなど、思い切り遊べるときに使ってみてください!
それでは!
